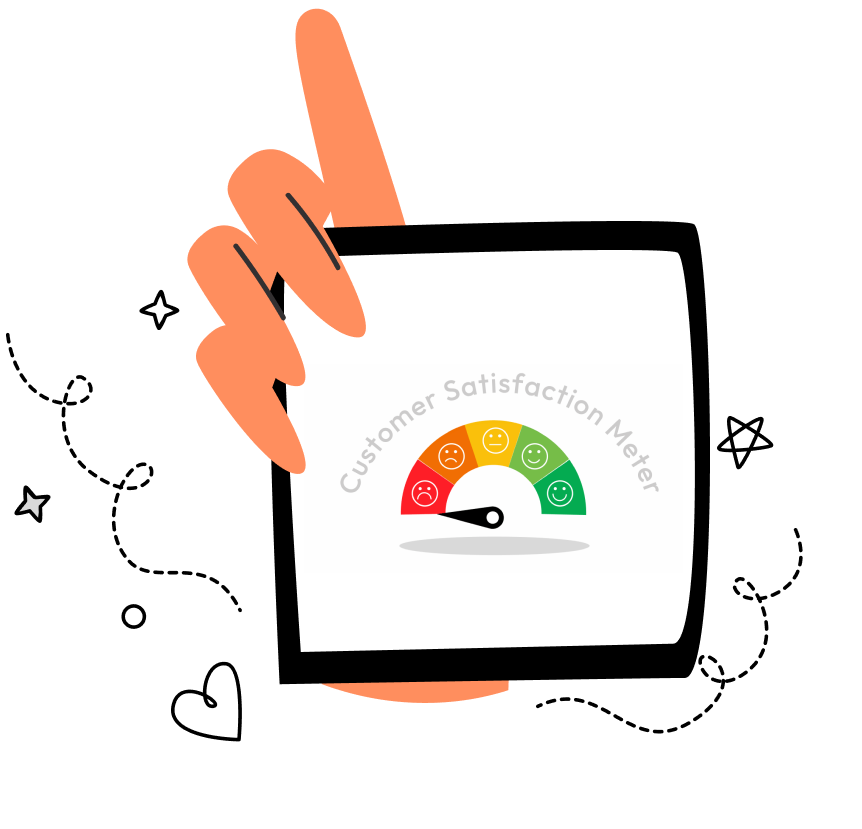
In this tutorial, you’ll learn how to design a simple yet effective customer satisfaction meter/gauge in Figma. This gauge type can be used to represent customer satisfaction levels in your app or dashboard visually.
Step 1: Set Up Your Frame
- Create a Frame:
- Open Figma and create a new frame by pressing
For selecting the Frame tool from the toolbar. - Set the size of the frame to
800x600pixels.
- Open Figma and create a new frame by pressing
- Add a Background:
- Select the frame and choose a background color. For a clean look, you can use a white color
#FFFFFF
- Select the frame and choose a background color. For a clean look, you can use a white color
Step 2: Create the Gauge Arc
-
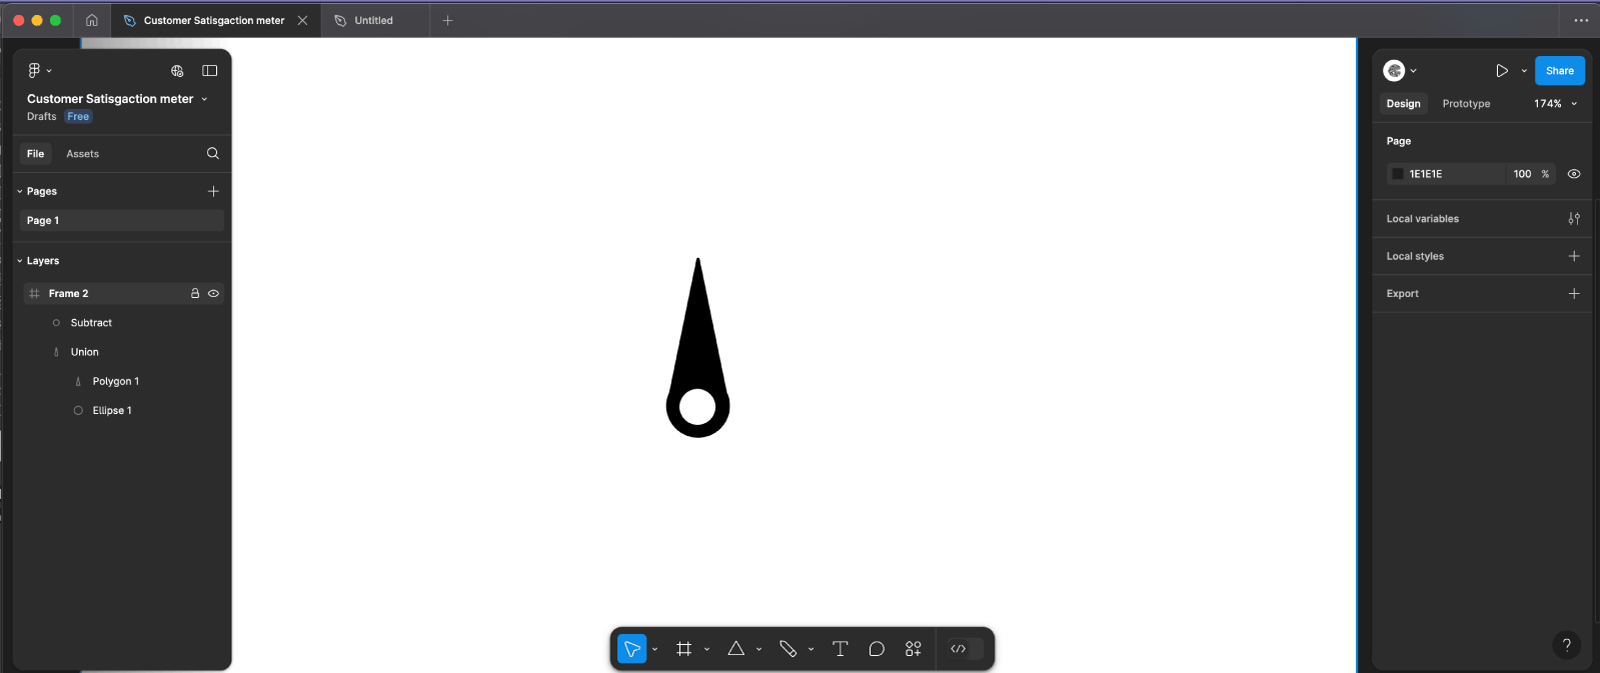
- Draw a Circle:
- Select the Ellipse tool
Oand draw a perfect circle by holding down theShiftkey while dragging. Set the size to40x40pixels. - Align the circle to the center of the frame.
- Select the Ellipse tool
- Create a Triangle:
- Use the Polygon tool
Shift + Pto draw a triangle. In the properties panel, set the number of sides to3. - Adjust the triangle’s size so that it intersects the top half of the circle. Position the triangle over the circle so that the base of the triangle aligns with the bottom of the circle, and the point touches the top of the circle.
- Use the Polygon tool
- Intersect the Circle and Triangle:
- Select both the circle and the triangle by holding
Shiftand clicking on each shape. - In the top toolbar, click on the “Intersect” option to create an arc shape from the intersection of the circle and the triangle.
- Select both the circle and the triangle by holding
- Add a Smaller Circle:
- Draw another circle using the Ellipse tool
Oand set its size to25x25pixels. - Align this smaller circle to the bottom of the big circle intersected shape.
- Draw another circle using the Ellipse tool
- Subtract the Smaller Circle:
- Select both the intersected shape and the smaller circle by holding
Shift. - In the top toolbar, click on the “Subtract” option to cut out the smaller circle from the intersected shape, creating a hollow arc.
- Select both the intersected shape and the smaller circle by holding
- Style the Arc:
- Set the fill color of the final arc shape to black
#000000. - If you want to represent a specific satisfaction level, you can duplicate the arc, rotate it, and trim it using Boolean operations to match the desired angle.
- Set the fill color of the final arc shape to black
- Draw a Circle:
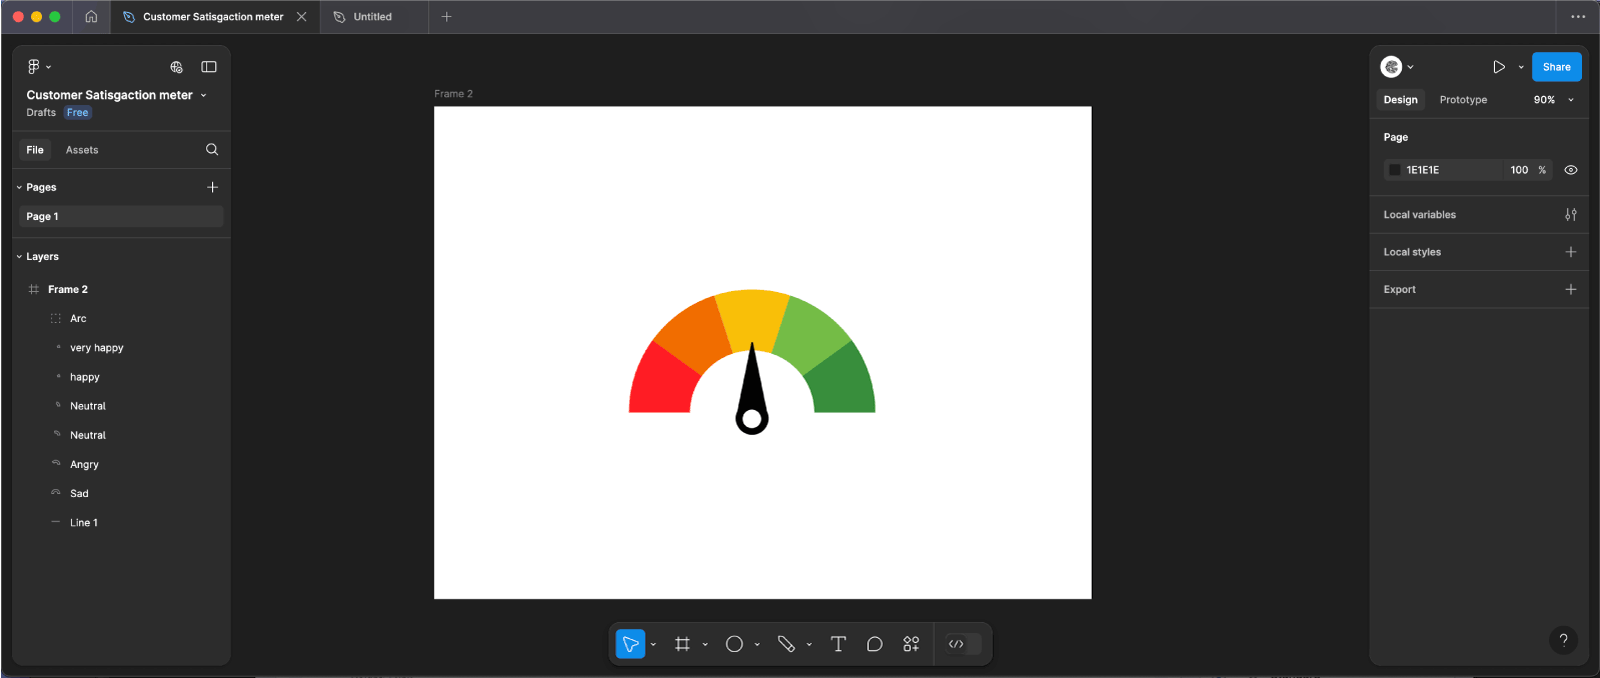
Step 3: Adding the Rating Sections
- Create the First Half Circle:
- Draw a circle using the Ellipse tool
Oand set the size to300x300pixels. - Convert the circle into a half-circle by adjusting the Arc settings in the right panel. Set the
Startangle to-90°and theEndangle to90°. and the radius to50% - Fill the half-circle with red
#FF1C25to represent an angry customer.
- Draw a circle using the Ellipse tool
- Duplicate and Adjust Colors:
- Duplicate the half-circle
Ctrl/Cmd + Dfour times to create the other rating sections. - For each duplicate, decrease the radius by
10%and change the fill color as follows:- Sad Customer: Orange
#F16D00 - Neutral Customer: Yellow
#FABF09 - Happy Customer: Green
#75BC46 - Super Happy Customer: Dark Green
#388E3C
- Sad Customer: Orange
- Duplicate the half-circle
- Position the Sections:
- Arrange the five half-circles in a row, aligning them horizontally with equal spacing between each.
- Ensure that all the half-circles are positioned within the arc created in step 2, forming a complete gauge.
- Group the Sections:
- Select all five half-circles and group them
Ctrl/Cmd + G. This grouping makes it easier to adjust or move the rating sections.
- Select all five half-circles and group them
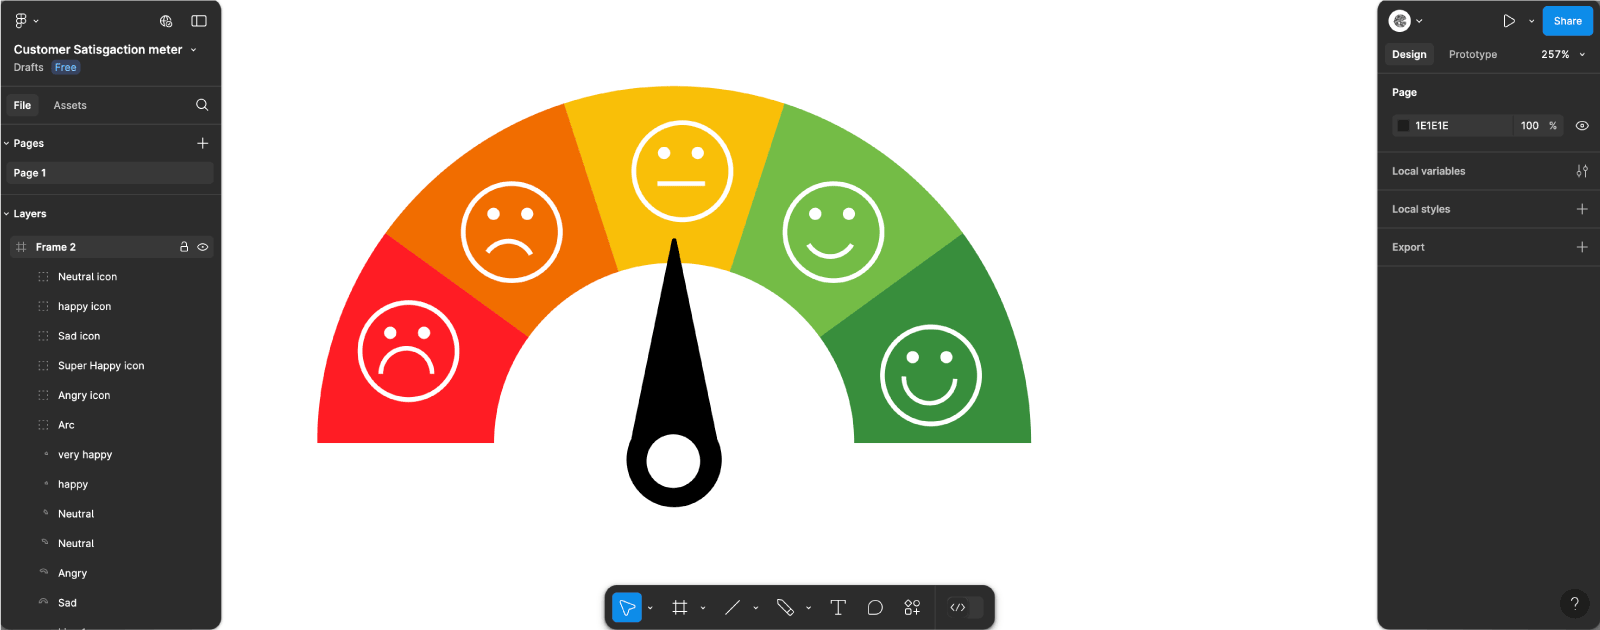
Step 4: Adding the Icons
- Add Icons to Each Section:
- Option 1: Draw the Icons:
- Use the Pen tool
Por Shape tools to draw simple icons representing each emotion:- Angry: A frowning face with furrowed brows.
- Sad: A slightly downturned mouth and teardrop.
- Neutral: A straight line for the mouth.
- Happy: A smiling face.
- Super Happy: A wide smile with raised eyebrows or a starry-eyed face.
- Use the Pen tool
- Option 2: Use the Iconify Plugin:
- Install the Iconify plugin in Figma if you haven’t already.
- Open the plugin and search for relevant icons:
- Angry: Search for “angry face” or “frown.”
- Sad: Search for “sad face” or “teardrop.”
- Neutral: Search for “neutral face” or “meh.”
- Happy: Search for “smile” or “happy face.”
- Super Happy: Search for “grinning face” or “star eyes.”
- Drag and drop the icons onto the corresponding half-circle section.
- Option 1: Draw the Icons:
- Style and Align the Icons:
- Adjust the size of each icon to fit well within the half-circle.
- Center the icons horizontally and vertically within their respective sections.
- Ensure that the icons contrast well with the background color of each section.
- Group the Sections with Icons:
- Select each half-circle and its corresponding icon, then group them
Ctrl/Cmd + G. - Finally, group all five sections together to keep the entire rating gauge organized.
- Select each half-circle and its corresponding icon, then group them
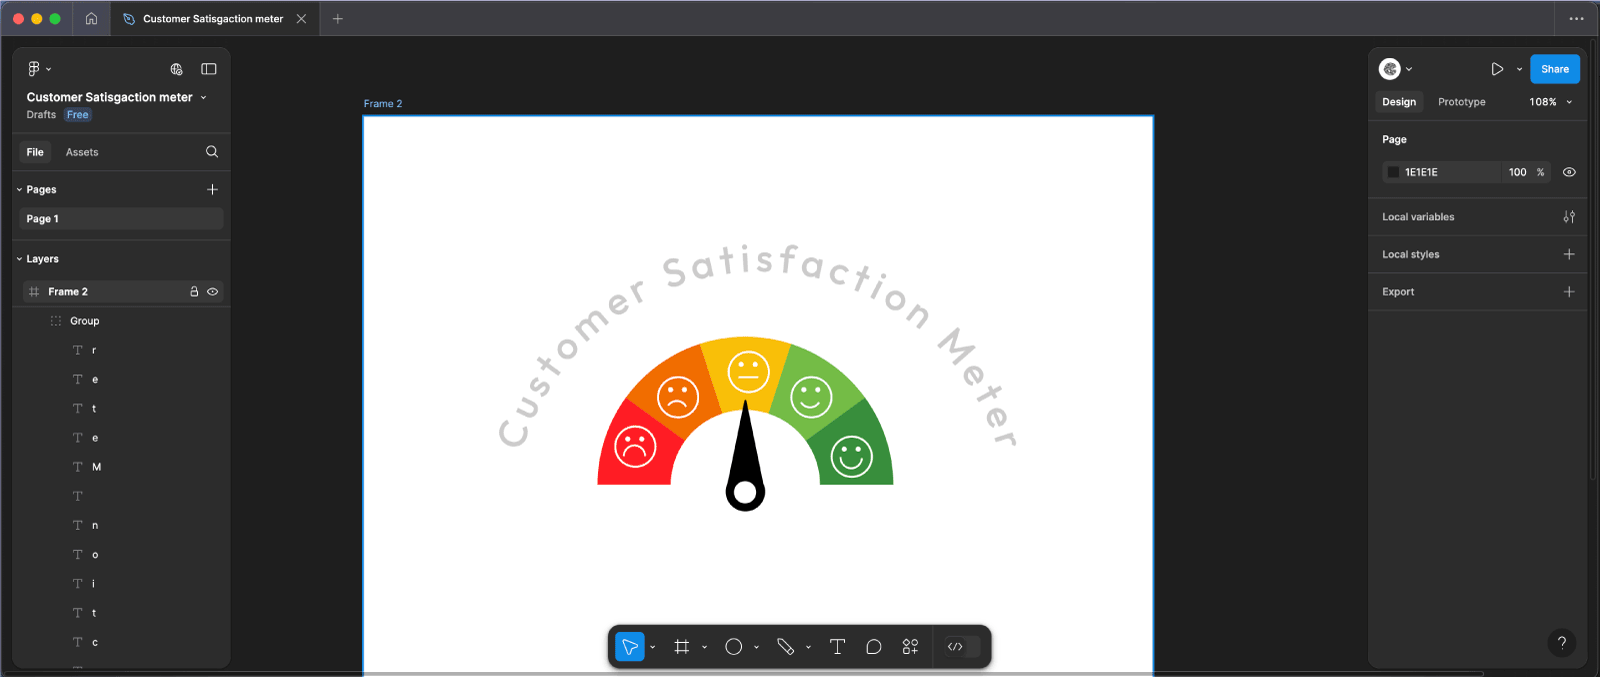
Step 5: Add Arced Text Using the Arc Plugin
- Install the Arc Plugin:
- If you haven’t already installed the Arc plugin in Figma, go to the Figma Community tab, search for “Arc,” and install it.
- Add the Text:
- Use the Text tool
Tto type “Customer Satisfaction Meter.” - Set the font to
Outfit, the size to40px, and adjust the weight to bold.
- Use the Text tool
- Apply the Arc Effect:
- With the text selected, open the Arc plugin.
- In the Arc plugin, set the arc value to
40to create a smooth, rounded arc that follows the curve of your gauge. - Position the arced text above or around the top of your gauge, ensuring it aligns with the overall design.
- Adjust the Placement:
- Once the text is arced, you can manually adjust its placement by dragging it into the desired position on the canvas.
- Make sure the text is centered and doesn’t overlap with other elements of your design.
- Style the Text:
- Set the text color
#CCCBCBfor a soft contrast against the background. - If necessary, fine-tune the arc and placement to fit the overall design.
- Set the text color
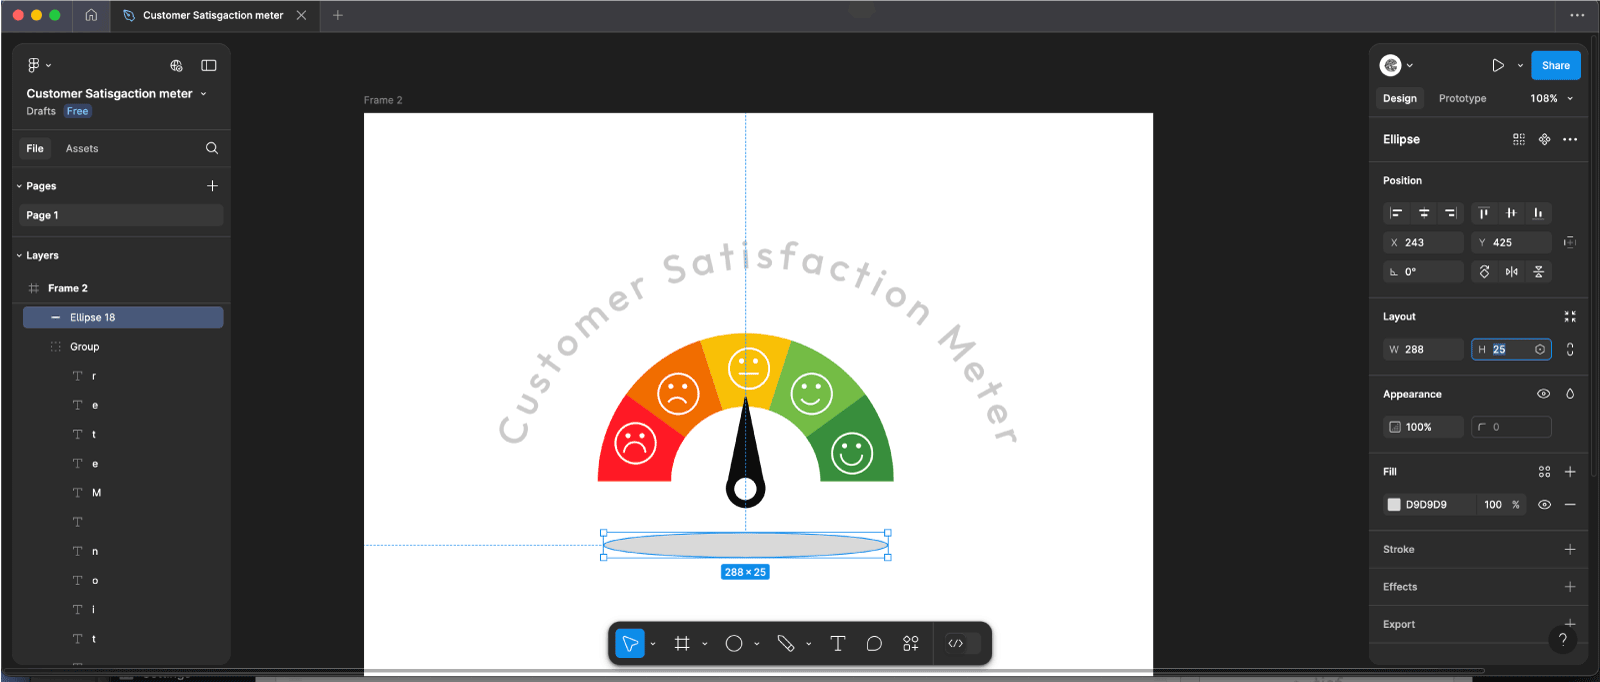
Step 6: Add a Circle Shadow
- Draw the Shadow Circle:
- Select the Ellipse tool
Oand draw a circle. - Set the circle’s dimensions to
288pxheight and25pxwidth.
- Select the Ellipse tool
- Style the Circle:
- Set the fill color of the circle to
#D9D9D9to give it a soft shadow appearance.
- Set the fill color of the circle to
- Position the Shadow:
- Place the circle behind your gauge, aligning it so that it appears as a subtle shadow beneath the meter.
- Adjust the placement if needed to ensure the shadow looks natural and enhances the overall design.
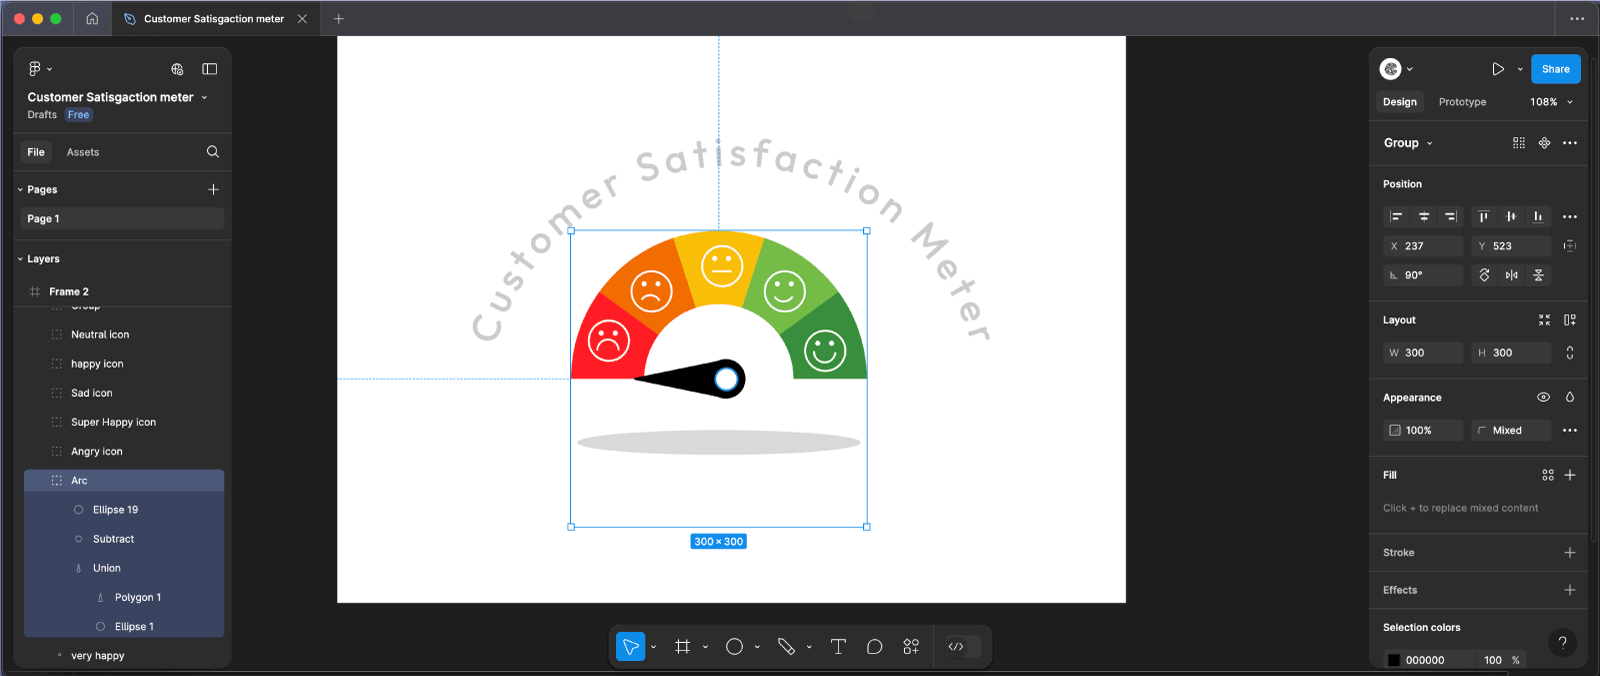
Step 7: Prepare and Rotate the Gauge Arc
- Create the Movement Circle:
- Select the Ellipse tool (
O) and draw a circle with dimensions of300x300pixels. - Set the fill color to transparent by clicking on the color fill option and selecting “None.”
- Select the Ellipse tool (
- Align and Group:
- Center the transparent circle with the colored sections of your gauge.
- Select both the transparent circle and the gauge arc.
- Group them
Ctrl/Cmd + Gand name the group “Arc” in the layers panel.
- Rotate the Arc:
- With the “Arc” group selected, use the rotation handle (circular arrow icon) to rotate the gauge arc. Set the rotation to
90 degreesfor the desired angle.
- With the “Arc” group selected, use the rotation handle (circular arrow icon) to rotate the gauge arc. Set the rotation to
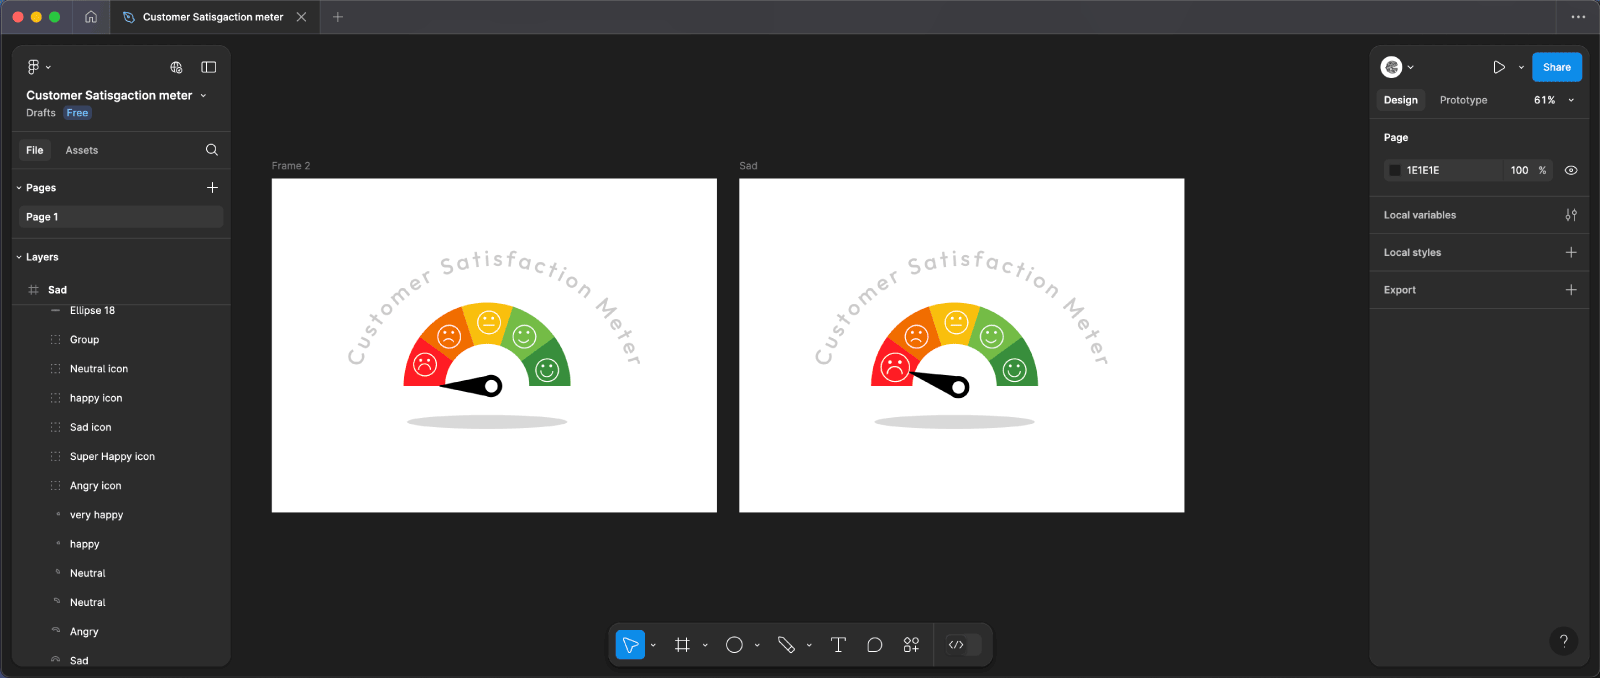
Step 8: Create the “Angry” State
- Duplicate the Frame:
- In the layers panel, right-click on the current frame and select “Duplicate.”
- Rename the duplicated frame to “Angry.”
- Adjust the Gauge Arc:
- Select the “Arc” group within the “Angry” frame.
- Rotate the gauge arc to
73 degreesto reflect the “Angry” state.
- Resize the Sad Icon:
- In the “Angry” frame, locate the sad icon that corresponds to the “Sad” section of your gauge.
- Increase the size of the sad icon to
53pxto emphasize the “Angry” state.
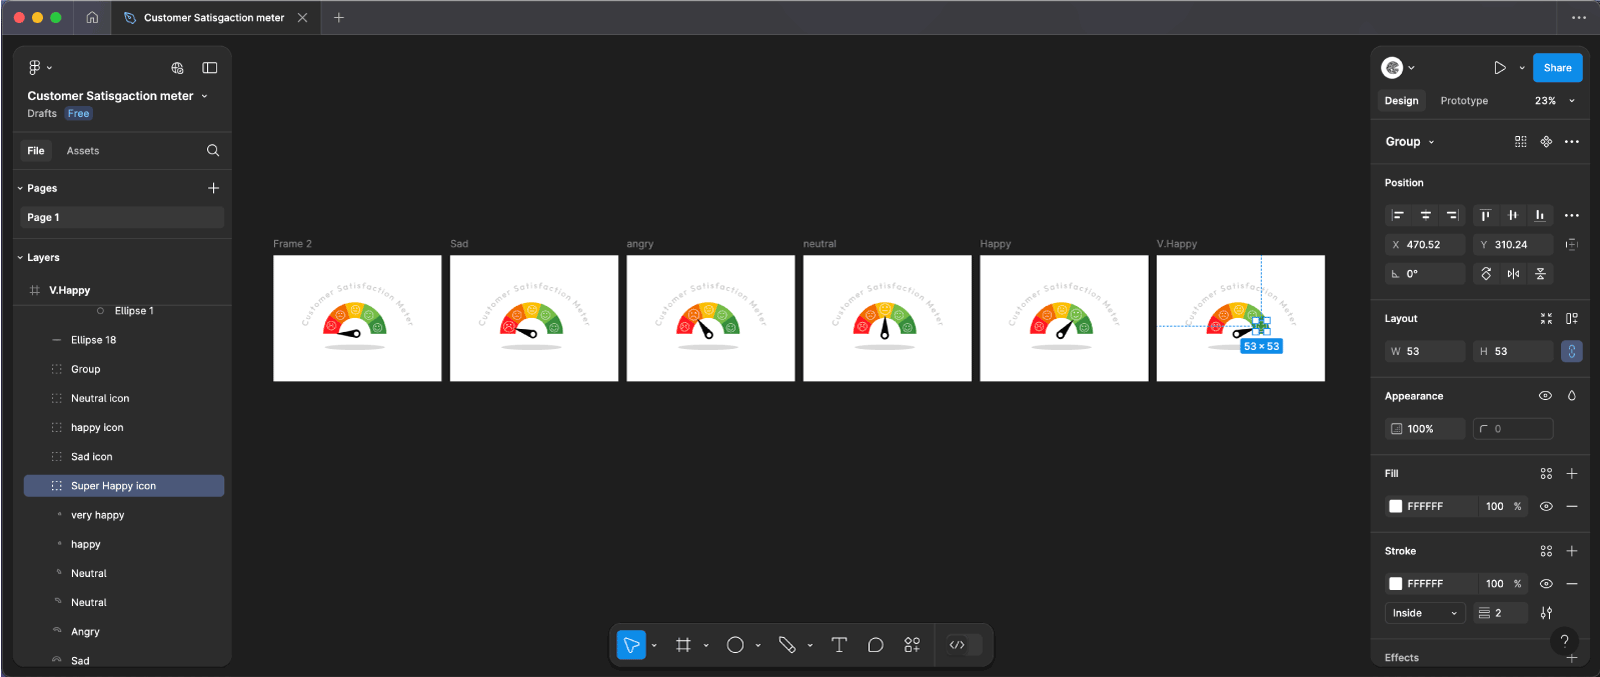
Step 9: Create Individual States for Each Icon
- Duplicate the Frame for Each State:
- Right-click on the “Angry” frame and select “Duplicate.”
- Repeat this process for each emotion: sad, neutral, happy, and super happy.
- Rename each duplicated frame to match the emotion it represents (e.g., “Sad,” “Neutral,” “Happy,” “Super Happy”).
- Adjust the Gauge Arc and Icons:
- Sad Frame:
- Rotate the gauge arc in the “Sad” frame to reflect the next level of dissatisfaction.
- Increase the size of the sad icon to
53pxto emphasize this state.
- Neutral Frame:
- Rotate the gauge arc in the “Neutral” frame to center it.
- Increase the size of the neutral icon to
53px.
- Happy Frame:
- Rotate the gauge arc in the “Happy” frame to the corresponding degree of happiness.
- Increase the size of the happy icon to
53px.
- Super Happy Frame:
- Rotate the gauge arc in the “Super Happy” frame to the final degree representing satisfaction.
- Increase the size of the super happy icon to
53px.
- Sad Frame:
- Check and Organize:
- Ensure each frame is properly named according to the emotion it represents.
- Double-check the rotation angles and icon sizes to ensure they correctly reflect the intended state.
Make the Prototype Interactive and Create a Loop
- Enter Prototype Mode:
- Switch to the “Prototype” tab in Figma to start linking the frames.
- Link the First Frame to “Angry”:
- Select the first frame (e.g., “Neutral”).
- Drag the noodle (interaction line) from the first frame to the “Angry” frame.
- Set the interaction details:
- Trigger: After Delay
- Delay: 50 seconds
- Animation: Smart Animate
- Duration: 1600ms
- Link the Subsequent Frames:
- Repeat the process by linking the “Angry” frame to the “Sad” frame, the “Sad” frame to the “Neutral” frame, and so on.
- Use the same settings for each interaction:
- Trigger: After Delay
- Delay: 50 seconds
- Animation: Smart Animate
- Duration: 1600ms
- Create a Loop:
- Finally, link the last frame (e.g., “Super Happy”) back to the first frame.
- Apply the same interaction settings to ensure the prototype loops continuously.
- Test the Prototype:
- Click the “Play” button to preview your interactive prototype.
- The frames should transition smoothly between each state, with a 50-second delay and smart animation, creating a seamless loop.
Save and Share
- Save: Don’t forget to save your work!
- Export: Select your 3D text group, click
Exportin the right panel, choose your format (PNG, SVG, etc.), and hitExportand Enjoy!
Final Result
Grab it!